Sunday, July 29, 2012

Late Night Canning

This week, my CSA box included:

  •  Beans
  • Eggplant
  • Green Peppers (probably Bell-ish)
  • Yellow Squash
  • Lettuce
  • Swiss Chard
  • Beets (really lovely beets, with amazing greens)
  • Watermellon
  • Green Onions
  • Basil
  •  Eggs 
  • Tomatoes
  • Zucchini


 One thing that I'm starting to get good at is knowing what I really will be able to eat during the week.  I'll acknowledge that in my first few boxes I lost more than a few batches of greens, two or three servings of broccoli, and a few bunches of broccoli and radishes.  I thought I would eat them, but there was simply too much.  I've gotten better and being realistic with myself.  The conversation goes a little like this:

Look at those beet greens, and those swiss chard leaves.  They're so pretty.
Okay, sure, but you're not going to eat them before they go bad.
But they're so pretty.  So fresh.  They would taste so good!
You know what else tastes good?  Tomatoes and cucumbers.  And you like those better.  That's what you're going to eat.
But.  But.  Pretty.
Shut up and get them in the freezer.
You're mean.
Yeah, I don't care.  Just get it done so we can go to sleep at a reasonable hour.
Jerk.

If this conversation doesn't make sense to you, it might help to keep in mind that I am an Aries/Pieces Cusp.

Fridays and Saturdays have become pretty much all about freezing, drying, and canning.  More on that to come.  What's left is the things that really can't be preserved, or that are much better fresh.  I mean, I'm going to cook that leafy green/broccoli/bean anyway, so why not cook it, freeze it, and eat it later.  Right now, I want to eat salad.

Salad with smoked trout, goat cheese, and
lemon tarragon dressing.

 And, as I said, Fridays and Saturdays have become devoted to food preservation.  Recipes are forthcoming, but here's a picture of the aftermath:

And now I'm going to bed too, because it's well past a reasonable hour...

Monday, July 23, 2012

Busy Busy!

How does it always work out that, the more I have to say, the less time I have to say it?

Last week was just a little busy, and, yes, I'm just a little behind on making some posts.  Vegetable season is in full swing, and I've been busy freezing greens, beans, and broccoli to eat over the winter.  My garden is also starting to produce, and I've picked four or five nice sized cucumbers, and about three tomatoes already.  Outside of that I've mostly got squash, which I am clearly going to have a bumper crop of.  And by "bumper crop" I mean the vines are taking over my yard.  Seriously.  They're going up over the fence into the neighbor's yard!
Pretty sure these want to eat me Little Shop style.
This fence is 7 feet tall.  The big leaves are are about 2-3 feet across.

If I disappear for more than a week, send a search party into the vines to look for me.  I should be okay.  There's more than enough zucchini in there to feed a small village.

This week, my CSA box included:

  • Broccoli
  • Beet Greens
  • Beans
  • Tomatoes
  • Eggplant 
  • Cucumbers 
  • Zucchini
  • Beets
  • Green Onions
  • Bell Pepper


 The beet greens immediately got washed and frozen to put into a stew in the winter.  I don't have time to eat all this food!
Sink full of beet greens.

Blanched beet greens headed towards the freezer.

For the beet stems, I decided to try something new.  I found a recipe for Swiss Chard Stem quick pickles, and decided to try replacing the Swiss Chard with Beet stems.

These are amazing.  They are everything I wanted the pickled rhubarb to be.  They're sweet and spicy and a little crunchy.  I haven't used them in anything yet, but I'm sure they will be delicious in a salad.  Maybe with some watermelon and feta cheese.

My only disappointment was that, while the stems were tightly packed into the jars while raw, the moment the hot liquid hit them and loosened them up a little, they suddenly took up far less space.  This left me with a lot of liquid to not very many pickles at all.  I guess that's the way it has to be, but it seems so wasteful.

Okay, looking at this picture I can see where
I could have packed these tighter.

This is quite a perfect recipe in my mind, too, because we really don't use the stems.  Beets, eaten.  Leaves, eaten.  But stems usually make it into the compost pile.  So finding a use for them is ideal.  Especially when it's delicious use.

Pickled Beet Stems:
(Makes 1 pint refrigerator pickles)
  • 1 1/2 cup beet stems
  • 1 cup apple cider vinegar
  • 2 cups sugar (I used half brown, because I ran out of white)
  • 2 cinnamon sticks
  • 2 bay leaves 
  • 6 whole allspice berries
Trim stems of any greens, and trim to fit in jars.  Pack into two half pint jars.

Combine remaining ingredients in a large pot, and bring to a boil, stirring to dissolve the sugar.  Pour over the stems, trying to split the spices evenly between the jars.  Refrigerate for 2-3 days to allow the flavors to marry.

These sealed themselves in the fridge.  Does that mean that I can keep them outside of the fridge?  Please don't do that, because you might get sick, but if you know the answer, please do let me know.  Is sealing enough?  I know that the amount of acid is important to preservation, and these are basically packed in vinegar, so will they survive outside of the fridge?  I would like to eat these all winter.  I would like to make a salad of these mixed with pickled watermelon rinds, over a little bit of spicy arugula, and maybe some goat cheese and sun-dried tomatoes.  In January, that might be the best thing I've ever eaten.

We've also had the opportunity (challenge) of working a lot of fresh vegetables into our daily meals.  I am finding a CSA to be a great value for it's money - when I figure that the particular box I got cost $385,  my first delivery came in the first week of June, and deliveries end "in November" - let's put that at 22 weeks.  That would be through the last week of October.  That's $17.50 a week.  Can you imagine trying to buy all the veggies I listed above for $17.50?

On the other hand, if you hate wasting food and don't have time to freeze/can, you might go crazy.  Because it is a LOT of food.

I don't have a recipe for this, but it was really good.  First full sized tomato of the season = grilled flat iron steak sandwich with lettuce and tomato.  I also mixed some basil into the mayo

Mmm... Flat Iron Steak Sandwich

Monday, July 16, 2012

Put Up or Shut Up Episode 2: Rhubarb

Maybe you're thinking about getting gardening, but you're not sure you can do it.  Maybe you're not sure that your soil is good, or you don't really have time to turn over a plot, or you've got a fairly shady yard.  Maybe you have a tendency to kill your house plants, and you're just not ready to take that outdoors where the neighbors can see and judge. 

Valid.

Might I recommend starting out with: Mint (in any of it's forms), sorrel, zucchini, and rhubarb.

Okay, maybe not the zucchini.  It takes a lot of room.  If you're not prepared for that, just stick with the mint, sorrel, and rhubarb.

Sorrel, if you've never had it, is a kind of salad green.  It comes back every year, and produces a big, kind of peppery, kind of lemony leaf.  It's probably not something you want to eat by itself, but it's a nice addition to a salad.

Mint is a weed.  There are a plethora of kinds of mint out there, if you want to get creative.  Mint, spearmint, chocolate mint, apple mint, pineapple mint.  Just make sure you want mint before you plant it.  I plant it under my bushes where the grass won't grow.

And rhubarb, well, we all love rhubarb.  Who doesn't love a good strawberry rhubarb pie?  (Answer: my dad.  He wants his pie all rhubarb, no strawberries.)  Rhubarb is very hardy, it's cold and drought tolerant, and the plants generally live for 8-15 years.  Also, in doing my research, I found that you're not supposed to have more than 4 or 5 buds (focal points where the stems come out of) coming out of the plant.  I ran out and did a quick check, and I appear to have significantly more than that (I lost track of which ones I had counted somewhere around 10, so I will be breaking up my rhubarb this fall next spring (just read that you should only break up rhubarb in early spring) if anyone nearby would like one.  I also learned that rhubarb does not appreciate temperatures over 90 degrees, which is probably why it's looked so sad recently.

One of the things that amuses me about rhubarb is that the more you pick, the more you get. Really.  It sort of chokes itself out under it's own leaves and just stops growing.  Thin out the leaves, and poof it starts growing again.

After a post on rhubarb last year, I received a comment on Facebook that you shouldn't eat rhubarb picked after the end of June, because the stalks get poisonous.  From what I can find on the internet, this is not true.  However, it does say that stems get tougher later in the season and, as we discussed previously, that rhubarb doesn't grow as well in hot weather.  So, if you pick when it's hot out, your plant might be damaged and the stalks won't even be that good.  Except I've never had a problem with tough stalks, and my plant is out of control... so I'm going to keep on picking!

In my opinion, the best way to preserve rhubarb is just straight up freezing.  Cut the leaves off and compost them, wash the stems, cut them up into about 1/2 inch pieces, and throw them in the freezer.  I like to freeze in two cup increments, because most rhubarb recipes I've seen call for rhubarb in 2, 4, or 6 cup increments.  When you need it, throw it in your pie, or cobbler, or your ribs, or your chicken, or whatever!

This year I also tried pickling some rhubarb.  It was just okay.  The flavor was there, but the texture was not.  I want a pickle to be crispy, and this was very soft and just a little stringy (like rhubarb can be) which made it a challenge to bite into.

I wonder, though, if this isn't because I have very thin rhubarb.  I don't think it's because my plant is overgrown - I've always had thin rhubarb.  And the parent plant that my rhubarb came from has thin stalks.  And the sibling plants that have broken off of both my and the parent plants have thin stalks.  Thin stalks are going to cook faster, and therefore get softer.

So, if you've got extra rhubarb to spare, try pickling it.

I also had the opportunity to use my new food toy.  For my birthday, my wonderful husband got me a food dehydrator.  Because, really, what I need is another way to stash away food.  I'm pretty sure I was a squirrel in a former life.

I tried the rhubarb in the dehydrator two ways: little pieces of rhubarb tossed in sugar and a little bit of cinnamon, and fruit roll-ups.

Yes, fruit roll-ups.  Or, I suppose I should say fruit leather so the fruit roll-up people don't find me and sue me.

The regular rhubarb was good.  It is sweet and sour and a little tangy, and will be a great addition to a trail mix.  I do love a trail mix, and it's nice to have something that I made myself to throw in.

But the fruit leather, this was the star.  Oh yes.  It was just exactly what you want a grown up fruit roll up to be - with real fruit and no preservatives, and actual little chunks of fruit.  It was not, however, a good way to preserve food.  Because it was so good I ate it all immediately!


Pickled Rhubarb 
Recipe from Serious Eats.  If you don't know already how I feel about making up your own canning recipes, here it is: Don't do it!

  • 1 pound rhubarb stalks (4 to 6 large stalks)
  • 1 cup apple cider vinegar
  • 1 cup water
  • 1 cup granulated sugar
  • 1/2 teaspoon fine grain salt
  • 2 teaspoons mustard seeds
  • 1/2 teaspoon black peppercorns
  • 1/2 teaspoon whole cloves
Prepare two wide mouth pint jars and lids.

Wash rhubarb stalks well and trim to fit into the jars. If the stalks are broad, slice them into lengthwise sections. In a small saucepan, combine the apple cider vinegar, water, sugar and salt and bring to a boil.

Divide the mustard seeds, peppercorns, cloves and star anise between the two prepared jars. Pack the rhubarb pieces into the jars above the spices.


Once the pickling liquid has boiled and the sugar and salt are dissolved, pour it into the jars over the rhubarb, leaving 1/2 inch headspace. Tap the jars gently to dislodge any air bubbles. If the headspace level has dropped significantly, add more pickling liquid.

Wipe jar rims, apply lids and rings and process jars in a boiling water bath canner for 10 minutes. When time is up, remove jars from canner and set them to cool on a folded kitchen towel. When jars are cool enough to handle, remove rings and test seals. If jars are at all sticky, wash them to remove that residue. Sealed jars can be stored in the pantry for up to 1 year. Unsealed jars can be stored in the refrigerator and eaten within 2 weeks.

Let this pickle cure for at least 48 hours before eating.

Dried Rhubarb

  • 2 lbs rhubarb stalks, washed and peeled if necissary
  • 1/4 cup sugar
  • 1 tsp cinnamon 
 Cut rhubarb into one inch pieces.  Combine sugar and cinnamon, and toss with rhubarb.  Dehydrate for about 8 hours at 125 degrees using your favorite dehydrating method (regular dehydrator, warm oven, car with the windows closed...)


Strawberry Rhubarb Fruit Leather
  • 2 lbs rhubarb, washed and sliced into one inch pieces
  • 1 pint strawberries, hulled and quartered
  • 1/4 cup honey
Combine all ingredients in a large pot or frying pan and simmer, uncovered, until the rhubarb is softened.
Blend rhubarb mixture with a stick blender, or add in small batches to a food processor or blender.  Feel free to leave a few chunks to add texture to the fruit leather.
 If you are using a food dehydrator, you will want to coat the trays with a small amount of olive oil.  Then, thinly spread the rhubarb mixture on the trays.  This recipe got me just about three trays worth.  Unfortunately, I only have two trays, so I mixed the remaining puree with a few shots of vodka and stuck it in the freezer to make a slushy.  In retrospect, that might have been the best part!


Tuesday, July 10, 2012

My CSA Box for the Week

This week, my CSA box from Rhine Center Vegetable Club included:
  • Basil
  • Kohlrabi 
  • Yellow Squash
  • Cucumbers
  • Dill
  • Peas
  • Fresh Garlic
  • Swiss Chard
  • Lettuce
  • Cabage
  • Beets and their greens


I also have some kale leftover from last week's box and, I'm ashamed to admit, I had to throw out a bunch of radishes that got soft before they got eaten.  It was the first wasted bit from my CSA box.

I'm thinking, to avoid further waste, I'm going to freeze the swiss chard, beet greens, and last week's kale.  Freezing greens works well - just blanch and shock them (cook them for a minute in boiling water, then transfer to a bowl of ice water to immediately stop the cooking process) and then stick them in a freezer bag.  It's my personal opinion that they don't come back well enough for just eating as a side (I like all of my veggies a little under cooked, I think), but they do come back well enough for stews and in pasta. 

It's been quite a challenge to build a menu for two around the box.  I see the amazing ingredients, and I want to turn each thing into it's own glorious full sized meal.  This doesn't work well, though, when each meal is like I'm cooking for four... Too many leftovers, and I've got something planned for the next day to use a different set of vegetables!  I need kids to help eat all this!  (No, mother, I'm not serious.  Sorry.)

So the preserving obviously continues...

I'm also at the point where I need to get as much as possible out of  my freezer, to make room for the new food I'm freezing.  I've got a few things left in there frozen: a full freezer bag of tomatoes, a few cups of corn, about a cup of shredded zucchini, and some green onions. The green onions and corn are probably just going to get thrown out.  Wasteful, I know, but it's time to start fresh.  I saved way too much corn last season, because I really, really, REALLY wanted the corn on the cob that I wasn't able to eat due to having braces.  Frozen corn thaws okay as a winter side dish, but it's not that great.  Two or three meals worth would probably have been enough. The zucchini will get added to some of this year's zucchini in a bread.  It really just worked out that I had one cup left, and there is very little that you can do with one cup! 

The tomatoes were a surprise.  I thought they were gone, or I would have used them months ago.  I could probably fill my whole chest freezer with tomatoes and still use them all up in the winter.  I will certainly have a post on preserving tomatoes, but freezing really is one of my favorite ways.  Just wash the tomato and throw it whole into the freezer.  Once it's solid, I put them all into freezer bags.  Then you can use them in anything cooked that calls for tomatoes.

This week is going to be a little frantic, so I've been planning for some crock-pot and quick grill meals.  I have dance class Monday, the husband has gigs Tuesday, Wednesday, and Saturday, and my dance troupe is performing Thursday-Sunday all day at a local street fair.  Which means I will be coming home hot, exhausted, and hungry.  And not really wanting to cook.  And I'm not willing to eat garbage for a full week (and waste my vegetables), so it's serious meal planning time.

Last night we started the crock-potting with a stewed chicken, cooked with tomatoes, zucchini, yellow squash, and mushrooms.  I'm going to call it summer Coq a Vin. Why not.

*Don't be afraid of the amount of garlic scapes in this recipe, or about leaving them large.  When cooked, garlic scapes lose almost all of their garlicy flavor, and end up tasting almost like green beans.


Summer Coq A Vin:
  • 1 whole chicken (about 3 lbs) cut into serving pieces
  • Kosher salt and freshly ground pepper
  • onion powder
  • garlic powder
  • 1 tbsp olive oil
  • 1/2 cup white onion, minced
  • 1/2 cup dry white wine
  • 1 lb mushrooms, chopped
  • 1 cup zucchini, chopped
  • 1 cup yellow squash, chopped
  • 2-3 garlic scapes, cut into bite sized pieces
  • 2 lbs fresh tomatoes or frozen tomatoes, peeled, or use canned
  • 1/4 cup fresh basil, thinly sliced
Season the chicken well with salt, garlic, and onion powder.  Heat the olive oil in a large heavy pan, and brown the chicken well on all sides, working in batches if necessary.  As it is browned, transfer the chicken to the slow cooker.

Once all the chicken is browned, add the onions to the pan.  Saute the onions for 3 minutes, or until they are just starting to brown.  Add the wine and deglaze the pan.  Pour the wine and onion mixture over the chicken in the slow cooker.

In a separate bowl, combine the remaining ingredients except basil.  Season well with salt and pepper, and pour over the chicken in the slow cooker. 

Cook on low for 8 hours.  Before serving, taste and adjust seasoning.  Stir in the basil and serve over pasta or rice.

Thursday, July 5, 2012

Happy (Belated) Fourth of July!

I hope everyone had a wonderful Fourth!  As a belated celebration, here is a flag made of bacon:

Enjoy!

I am traditionally in charge of bringing salad to food related events, which is a role I have come to have a love/hate relationship with.  On one hand, salad is kind of boring.  I mean, yes, there are choices, but when having a big dinner I usually just want a garden salad.  Okay, salad isn't boring, but I am generally boring when it comes to salad.  I'll admit it.  Save your spinach salad with strawberries and walnuts.  Save your weird pasta salad with uncooked noodles and some kind of weird seeds.  I just want a big bowl of crunchy lettuce, with tomatoes, cucumbers, mushrooms, peppers, and maybe some snap peas.  Once, at a family gathering, it was said: "Kate, nobody tosses a salad like you."

... Cue the uncomfortable silence... and then the hysterical laughter...

So I usually just make a regular salad.  On the other hand, if I'm not in charge of salad, someone else will be, and they're going to show up with a bag of pre-cut iceberg and a can of Mandarin oranges.  That's not a salad people!

But I wanted to go out on a limb this year.  I wanted to do something new.  I also didn't feel like buying a whole bunch of different kinds of dressing, because I'm cheap and someone always complains that there's no light ranch.

This isn't a family recipe, but it feels like it should be.  My family's Italian, and I feel like there are some good Italian influences in my cooking (I love pasta, I only believe in using olive oil, I'll slow cook anything in a good tomato sauce...)  Actually, I've only ever made this once before - about a week earlier - as an excuse to use up some bok choy.  It came out amazing, and moving forward will be a staple in the menu.

Panzanella, like pasta or an omelet, is a good base recipe to have.  You know how to make the basics, and then you just throw in whatever else you have.  It also feels good to me, because I'm using something (stale bread) that would have otherwise been thrown away or wasted.  Or used in French toast... damn, now I want French toast...

Moving on.  The basic ingredients for panzanella are  stale bread, tomatoes, olive oil, vinegar, salt, pepper, onions, and basil.  Anything else, according to purists, and you've no longer got panzanella.

Okay, fine, we'll just call it bread salad in front of any purist.

My base recipe looks something like this:

  • 1/4 cup (or less) acid (in the form of fresh lemon juice, or a good quality vinegar)
  • 1/4 cup (or less) olive oil
  • 1/4 cup fresh herbs
  • 1 pound stale bread
  • Up to 3 cups vegetables
  • Salt and pepper
The "or less" comes in based on the vegetables.  You want 1/2 cup liquid total, so if you've got a liquid-y vegetable (like a tomato, which I know is really a fruit), you'll want to add less liquid.  Where that liquid is reduced from is going to depend on where the liquid is coming from.  If it's an acidic ingredient, like tomatoes, you'll want to add less acid.  If it's not acidic, and I'm not having good luck coming up with anything that would produce a lot of liquid and not be acidic, you might want to reduce the olive oil.

My two recipes looked like this:

Cucumber and Bok Choy Panzanella
  • 1/4 cup lime juice
  • 1/4 cup olive oil plus additional
  • 1/4 cup minced red onion
  • 3 tbsp basil chiffonade (long, thin strips)
  • 2 tbsp minced garlic scapes
  • 2 tsp sea salt, divided
  • freshly ground pepper
  • 1/2 half of a large cucumber, quartered and roughly chopped - about 1 cup
  • 1 lb stale bread, any kind
  • 1 head bok choy 
  • 1/4 cup crumbled feta cheese
In a large bowl, whisk together first five ingredients, 1 tsp salt, and pepper to taste.  Peel cucumber if desired, then cut into quarters lengthwise, then into bite sized pieces.  In a separate bowl, toss the cucumbers with the remaining salt and allow them to sweat.  This will pull out some of the liquid, which will all get added to the panzanella, but you probably won't get more than a tablespoon.  If you have a really big cucumber with lots of moisture, you may want to take that into account and reduce some of the olive oil.

Meanwhile, heat a grill.  Cut the bread into large slices (I actually used brat buns, and just sliced them in half as you would to put a brat on them) and brush both sides with olive oil.  Grill the bread on both sides until just toasted, and set aside.  Next, pull the bok choy apart into its separate leaves, and season with salt on both sides.  Place each bok choy leaf on the grill for about a minute per side.  The stems should be just softened, and the edges of the leaves should be starting to char.

Slice the bread into 1 inch cubes.  Roughly chop the bok choy.

Add the cucumbers and their liquid to the oil and vinegar and stir to combine.  Gently fold in the bread, bok choy, and cheese, making sure that the liquid is evenly distributed amongst the bread.  You don't want a pool at the bottom, causing that bread to get soggy.  The best way to do this is to start with a bowl much larger than you'll need for everything, and then mix with your hands.

This was a perfect accompaniment for lime marinated grilled salmon on a hot night.

Picnic Panzanella
  • 1/8 cup lemon juice
  • 1 tbsp champagne vinegar
  • 1/4 cup olive oil plus additional
  • 2 tbsp basil chiffonade
  • 1 tbsp chopped cilantro
  • 1 tbsp minced chives
  • 1 tbsp minced garlic scapes
  • 2 tsp salt, divided
  • freshly ground pepper to taste
  • 1 cup grape or cherry tomatoes, halved or quartered depending on their size
  • 1 cup chopped cucumber
  • 1/2 cup chopped young zucchini
  • 1/2 cup chopped young yellow squash
  • 1 lb stale bread
In a large bowl, whisk together first seven ingredients, along with 1 tsp salt and pepper.  In a second bowl, combine tomatoes, cucumbers, and squash, along with the remaining salt, and allow to sweat.

Heat a grill.  Brush the bread with olive oil on both sides, and grill until toasted.  Slice the bread into one inch cubes.

Add the tomatoes, cucumbers, and any accumulated juice to the oil and vinegar.  If you don't feel you've got a full tablespoon of liquid, add additional vinegar.  Add the bread, and gently fold until well combined.

Sunday, July 1, 2012

Put Up or Shut Up: Episode 1 - Greens

My CSA box this week contained:

Lettuce, basil, snap peas, squash, zucchini, kale, cucumbers, radishes, broccoli, spinach, bok choy, and eggs.

So many leafy greens!


Here is a riddle that I have heard:

Q: What is the only fruit or vegetable that is not frozen, dried, pickled, or preserved in any way?
A: Lettuce

This riddle is false per my kitchen this year.

I know last year I was trying to figure out what to do with additional lettuce.  I wilted some of it like a bitter green.  It was pretty bad.

But lettuce is one of those things that just keeps coming.  And it starts far before the rest of your salad ingredients are ready to pick.  And if you don't keep up with it, it turns bitter and gross.  I know that my CSA box has recently been packed with it in all it's forms, coming faster than I can use it.  And that doesn't include the lettuce that's quickly turning bitter in my garden.  Lettuce, beet greens, Swiss chard, bok choy, spinach, arugula, not to mention the mint and oregano that is quickly taking over by back yard...

So what do you do with it all?  I hate waste.

I have tried blanching and freezing spinach.  It's an option, but frankly I don't feel like it thaws out well enough that I ever really want to eat it.  It's good for stuff that frozen spinach goes in to, like a spinach  dip (and who doesn't love a good spinach dip), but that's really about it.  It's certainly not something that I would just eat as a side dish for dinner - especially when some of the vendors at the winter farmer's market have spinach growing in their greenhouses almost all year long.

I was watching the Cooking Channel, and Alton Brown was making Pistachio and Mixed Herb Pesto.  This got me thinking about spinach pesto, and arugula pesto, both of which I have eaten and which taste good.  Which was a light bulb moment for me: you can make pesto out of any leafy green.

Even lettuce.

(I talked about and provided my lettuce pesto recipe here.)

And once pesto is made, it is easily frozen and lasts up to a year.  Meaning lettuce can be frozen and saved for later!

My basic pesto recipe is:

  • 2 tbsp toasted nuts
  • 2 tbsp garlic
  • 2 cups green stuff
  • 1/4 cup olive oil
  • 2 tbsp shredded cheese
Process nuts, garlic, and greens in a food processor until combined into a thick paste, but not past the point where you can still see flecks of individual ingredients.  Slowly add the olive oil while continuing to process.  Add the cheese when ready to serve.
It should look kind of like this
The good thing about this recipe is that two cups of any leafy green is not really a lot.  This is basically the tops of any bunch of veggies you might pick up.  No, those tops are not garbage!  If you're paying by the pound, you paid for those tops!  So you might as well get as much as you can out of them.  If they're fresh and you're in the mood, saute them up and serve them for dinner.  But, if you don't have time, why not take 5 minutes (that's really all this recipe takes) and turn them into some pesto that you can use later.

Here are a few examples:

I thinned my carrots and turned the carrot greens into pesto.  I used walnuts instead of pine nuts because walnuts go into carrot cake.  I wish that I had planted more carrots so I had more greens to thin.  If you've never had carrot greens, they're definitely lightly carrot flavored, but also have a serious grass/clover flavor to them.  Like good grass.  Like when you're a kid and you chew on a long stalk of grass.  Combined with the walnuts which are a little sweet, I felt this was done without the cheese.  I also did not add any garlic (I know, shocking, right?!?)  I got only one serving, which I have not made into a meal yet, but I am waiting to pair it with something with a strong flavor like beef.  I'm thinking this would be a great topping to a steak sandwich.  Last summer (after scouring the internet and deciding they were not poisonous), I put  my carrot tops into my chicken stock.  In retrospect, I think that was a waste.   This is how I'm using my carrot tops from now on.

Next came beet greens.  I again used the walnuts, because I bought too many for the carrots and I didn't want to hang on to them.  I also found a fair number of beet and walnut salad recipes on the internet, so I figured they had to be a good pairing.  When I tasted it, I wanted it to be just a little sweeter.  The beets are sweet, but I didn't think this carried through in the beet green pesto.  It was confusing.  Are you sweet?  Are you not sweet?  Pick one and go with it!  So I ran to the store and picked up some maple candied macadamia nuts.  Pricy?  Yes.  Amazing?  Also yes.  These are sold in bulk at my local natural foods store and they are absolutely my favorite snack that I cannot afford.  So I used you good readers as my excuse to purchase far more than I needed which I will be taking to work to eat there.  Taste wise, the first was fair, the second amazing.  Appearance wise, both were a little lacking.  Beets bleed.  They make a mess of my hands and cutting board and counter every time I cook them.  The greens, while mostly green, contain some of the color and all of the bleeding in their stems.  When this was split in the food processor, the red color went everywhere, combined with the green leaves, and mostly looked brown.  Still delicious, but I wouldn't recommend this for your fancy food party.

Then arugula with pine nuts, and spinach with almonds.  Spinach/almond is my favorite, because it just feels so healthy!

Last but not least, mint pesto.  I used the traditional pine nuts, but any of the other options would work too.  This is some serious stuff, and I wouldn't recommend using it straight up in a pasta.  A better choice again would be a spread on a sandwich, or maybe an accompaniment to some fish or lamb.

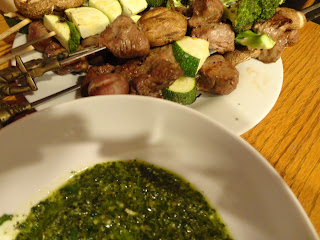
For a quick dinner, I made some beef, zucchini, mushroom, and potato shish kabobs.  I boiled the potatoes first so they were almost completely cooked, seasoned everything with salt and pepper, then threw the skewers on the grill for about 3 minutes per side.  I was lucky enough to receive some tenderloin tips for kabobs along with my beef purchase, but you could really make these with any kind of beef.  Or lamb.  Or chicken.  Or shrimp...
The finished product. You can still see the individual little bits


Mint Pesto DipMakes enough to freeze for later
  • 2 tablespoons pine nuts
  • 2-3 large garlic cloves, roughly chopped
  • 2 cups mint leaves, washed
  • 1/4 cup olive oil
 Heat a large, heavy skillet over medium high heat (no oil).  Add pine nuts, and toast,stirring frequently, until pine nuts start to smell extra nutty and get just a little brown.  Be careful, when they go they go fast.  If you burn them, throw them away and start over!

Remove the toasted pine nuts from the pan immediately (if you leave them in there, they will keep cooking!), and add to the bowl of a food processor.  Add garlic cloves, and process for 4 to 5 short pulses, until the nuts and garlic are just broken up.

Add the mint, and continue to process, until you have a mixture that resembles a flecked counter top - it's consistent in it's appearance, but you can still see the individual pieces that make up the pesto.  Add the olive oil and process for two or three more short pulses to combine.

Dip your kabob meat and vegetables into the pesto.  It is also excellent as a spread on some good crusty bread.


Lettuce Pesto
(Reprinting, just to have them all together)

  • 2 tbsp pine nuts
  • 2 tbsp garlic scapes,
  • 2 large hand-fulls of lettuce, washed and dried
  • 1 tbsp finely grated Parmesan cheese 
  • 1/4 to 1/2 cup olive oil
Toast the pine nuts as above.

Meanwhile, coarsely chop the garlic scapes.  Add the garlic to the pine nuts in the food processor, and process as above

Add the lettuce (I needed to add lettuce in two batches, because it didn't fit in my food processor bowl.  This is perfectly fine.) and process until the lettuce is just broken down into small pieces. should still be able to see individual bis of lettuce, nut, and garlic.  Continue to process, adding olive oil in a slow stream.  How much you use will depend on what you are using your pesto for - a spread will get less oil, while a pasta sauce will need more.

I recommend serving this on a cold pasta salad, because when warm it tastes a little like warm lettuce, which is weird.

Beet Green Pesto
(The ratios are changed up a little here to emphasize the sweet flavor of the beets)
  • 2-3 tbsp maple macadamia nuts
  • 1 tbsp garlic scapes
  • 1/4 cup sweet Italian basil
  • 2 cups beet greens, stems removed
  • 1/2 cup olive oil
Combine nuts and garlic in a food processor, and process as above (no toasting this time).

Add basil and beet greens, and process as above.

Slowly add in olive oil, and continue to process until combined.

While not particularly pretty, this was a delicious, light, and sweet pesto.  I would recommend it with pasta and seafood.  I'm thinking along the lines of some angel hair pasta mixed with the pesto, topped with grilled beet slices and maple bacon wrapped scallops.

That will have to be dinner very soon!